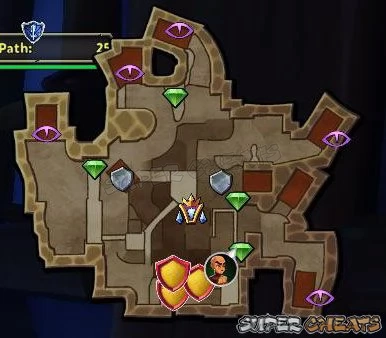
Little Horn Valley


Defense Points: 1200
Enemy Spawn Point (Ground): Five
Enemy Spawn Point (Air): None
Target to protect: One
This is one of the larger maps featuring three main barricades and two sub-cores to protect. Barrel Path goes along the Barrel Rig trap and leads to the upper center barricade. This path is closest to one of the barricades and must be blockaded completely. Consider placing additional blockades and towers just outside the barrel's range.

Deck Path will go along the East Gate Lock and to the eastern barricade. Consider building your blockade in the bottleneck near the gate lock.

The Lower Pass path will head straight to the lower center barricade. There's a barrel rig trap along the way.


High Ground path leads to the West Gate Lock and will end up on the western barricade. Gate Pass leads to the western barricade. There's a gate trap along the way. You need to strengthen your defenses in the area before the gate since the enemies have a short route to reach the western barricade.


The map has elevated platforms, perfect for the Huntress and Apprentice to safely and quickly perform ranged attacks. There are also chokepoints where you can place the Monk's Boost Aura and effectively buff the defenses along the way. One example is


Anything missing from this guide?
ASK A QUESTION for Dungeon Defenders II
Comments for Little Horn Valley
Add a comment
Please log in above or sign up for free to post comments- Basics
- Tavern
- Heroes
- Map - Dragonfall
 Join us on Discord
